Saturday 29 December 2018

A Call to Arms

Continuing with the upgrades, next up are armrests. I was inspired by seeing some Caterham armrests - not only do they act as straps to hold the door against the side of the car, they also prevent water splashing up into the cabin.

So, first up was some measurements transferred to a sheet of 1.5mm ally (sorry, pretty rubbish picture):


The strange shape is because my drivers side door has a bulge for my elbow. This was then cutout and bent into shape, using a combination of Black and Decker workmate and plain old bending by hand (quite surprised it worked so well):


Then a layer of foam to protect my delicate elbow:


...and vinyl applied with contact adhesive:


A set of M3 stainless steel bolts (hopefully won't go rusty and look crud) with countersunk cups, through the door material and into the flange on the armrest and job done:


Not been out to test them yet but looks great, doors feel firm and they lift up easily enough.

I also replaced the side mirrors with some funky (read 'tiny') numbers:


I've also got a new gear knob and USB sockets to fit...all good fun...

Happy New Year to you all!

Sunday 9 December 2018

Breakfast Blat

I had a great run out to meet up with the SKCC forum guys for breakfast at a golf club near Horsham. We met at 9am so I got up a bit early for a little  40 mile thrash which turned out to be awesome.

By some  fluke, I found a great couple of roads (must remember them for future) which were small B roads but not too small that you're worried about having space to pass cars. Traffic was light at 8am on a Sunday and I had a great time - Zedster sounded great, performed well and, most importantly, nothing broke or fell off!

Breakfast was nice, good chatting with other members and we've pencilled in a long weekend to Wales next September (I was already thinking of doing an earlier one by myself in April/May).


Wednesday 28 November 2018

Fully fLEDged

Spent a couple of evenings fitting the rear LED units. Like the front, these are all-in-one (tail, brake and indicator) and were a mere £65. They came with a cheap, plastic surround which looks ok from a distance but they may need changing one day. I bought these because the surround may be cheap but it was the only one I could find where it was cut at an offset angle so it fit nicely on the curved rear wing with no fettling required.

Compared to the old, blocky lights, they look great:


The wiring would have been pretty straightforward had I not conspired to keep getting it wrong and putting the terminals in the wrong slot of the plug. I had to take the damn thing apart about 3 times,  even cutting it off once, while lying on my back with my head in the wheelarch.

But the result looks great, i think:


So, as the contrived title of this post suggests, Zedster is now fully LEDd up, back and front.

Edit: actually, not quite true - the reversing and fog lights are still normal bulbs - doh!

Saturday 24 November 2018

The nut at the wheel

Recently, i have noticed a little way-wardness with the steering which i thought was just the wet and icy roads in this weather. But then, on my way home from work, I realised that I had a good 2 inches of play in the steering. I took the wheel off today and realised the main bolt holding the wheel into the column was loose. Thankfully a simple fix (adding some thread lock this time) and hopefully a return to go-kart level of directness.

Having decided that I wouldn't commute in Zedster too often, I've done just that for the last week. A combination of my old bones getting too cold on my motorbike and a very squared-off front tyre on said bike making the early morning ride a bit hairy, means Zedster has been the transport of choice.

One new problem at this time of year is being blinded by cars in my rear view mirror, so I've bought some anti-glare film for the mirror - fitted tonight, see how it goes.

Finally, I've continued to have wiring problems with the right, front DRL and indicator - I think the the wire was simply too short and vibrations were separating the spade terminals. So, I've added several inches of extra wiring to remove the tension - hopefully it will finally be fixed.

Sunday 18 November 2018

Wings and Things

With the headlamps now incorporating an indicator, I could safely get rid of the carbuncles that IVA required. I was considering just getting rid of them totally but i have a little problem with the wiring to my new headlamps. My fault but i seem to have a loose connection on one side and, occasionally, the indicator doesn't work. I've tried to rewire it again tonight so its hopefully fixed but I've decided its better to have dedicated indicators, in case of a repeat in future.

I bought some funky and tiny motorbike indicators and spent some time this evening fitting them and they look great - you can't see in the picture but they do that cool Kitt-style left to right motion:


The finishing touch was what i had planned to replace the indicators with - stick-on winglets:


They look pretty good and not bad for £5 - although I won't be surprised if they drop off on my first time out.

UPDATE: Yup, a couple did drop off but I think that was more because I knocked them with my feet. I like them so much, I decided to bolt them on, so they're here to stay.

Sunday 11 November 2018

Memorable memorial

On a very wet Rememberance Day, I went on a short trip with the SKCC forum guys on their annual visit to the tiny village of Stopham for their memorial service. It seems the club members stumbled upon the service a few years ago, the locals were pleased to see them, so they go every year.

Although it wasn't raining when i got up at 7am, the roads were soaked and, every now and then, it hammered down but Zedster took it in his stride. I still haven't got straps on my doors, so water still sprays up and wets my elbow but otherwise, i'm dry and almost too warm with the heat from the engine. I took the drive more carefully because of the conditions but it was still good fun, with a few (intentional) rear end drifts on roundabouts being much easier in the wet.

At the memorial service, as a newbie, I had to place the wreath which was a tad embarrassing - 5 old boys in suits and medals and me in my trainers and blue kagul with wet patch!

Although there were 5 or 6 of the forum there, only me and one other turned up in kits:


Zedster was in a right mess when I got back, so much so that I even had to wash him - shock!

The new LEDs continue to impress, although the high beam is not much brighter than the dipped. But with dipped being so good, it's not an issue:


In fact, I'm so happy with them, I've bought a set for the rears as well - hope to get them on in the next week or 2...

Saturday 27 October 2018

Lights and breaks

The LED units arrived so I set about fitting them - not complicated but fiddly and time-consuming.

The units are all-in-one; low beam, high beam, indicator and DRL and look pretty cool. The DRL needed a live ignition feed which I don't have at the front of the car, so I had to take the dash off and re-wire one of my gauges to add a wire on a live feed and then route that through the car along the existing loom to the front.

Removing the existing headlamp unit out of the bowl, I had to do a fair bit of re-wiring as I needed the indicator signal feed to go into the bowl and the new unit. The hardest part was removing the loom tape off the old wiring - that stuff is tough! But otherwise, it was very simple - the new unit fits neatly into the headlamp bowl with all the plugs and the little DC converter (?) the LEDs need. A final step was to change the indicator relay for a LED version, to keep the correct flash rate for the LEDs.

This is just the DRLs on:


When the indicator is on, that DRL flashes orange instead of solid white - very cool and bright. The low and high beam look pretty bright in the garage but not driven at night yet to tell how good they are.

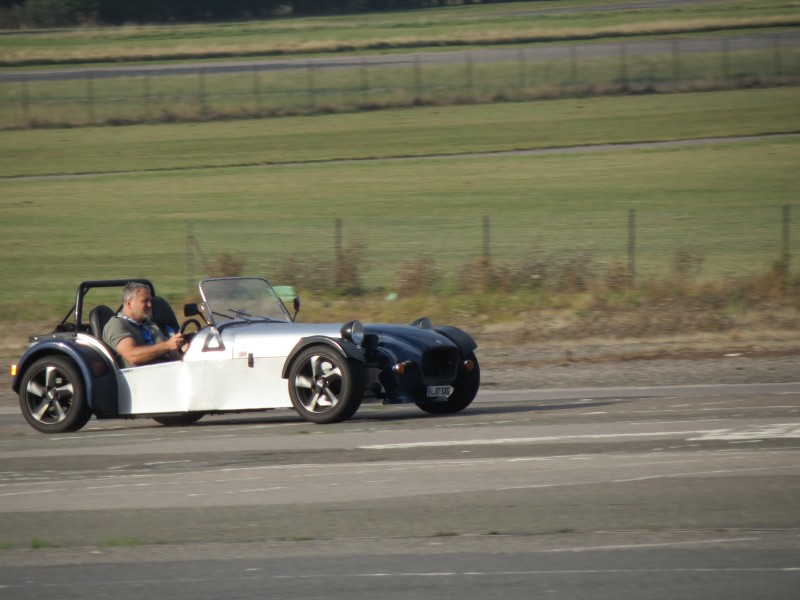
The day after fitting these, I went on an early morning run with the SKCC forum guys, meeting up at Pease Pottage (services on the M23):


We then had a great 70-odd mile cross-country route which was a good blast UNTIL 10 minutes from the end. At the suggestion of someone on the French trip I did last month, I brought some RainX for the windscreen, to help keep the screen clear in light rain without wipers. Now, I don't know if I put the stuff on wrong but, at certain temperatures (around zero maybe), the stuff turns opaque and it kept doing it on this run. It was very scary - one minute all fine and then seconds later my screen is totally obscured! It was during one of these blackouts, while I was frantically wiping the screen, that I missed a turning and lost the others. I turned round a few miles further up the road and set off in pursuit of the others. And then, just before Ditchling, PING and my throttle goes loose. I managed to coast to a reasonably safe stretch of road, bonnet and pedal box off and confirmed that the throttle cable has snapped at the pedal (and you thought I'd spelt the title of this post wrong, hey?).

But a pretty place to breakdown:


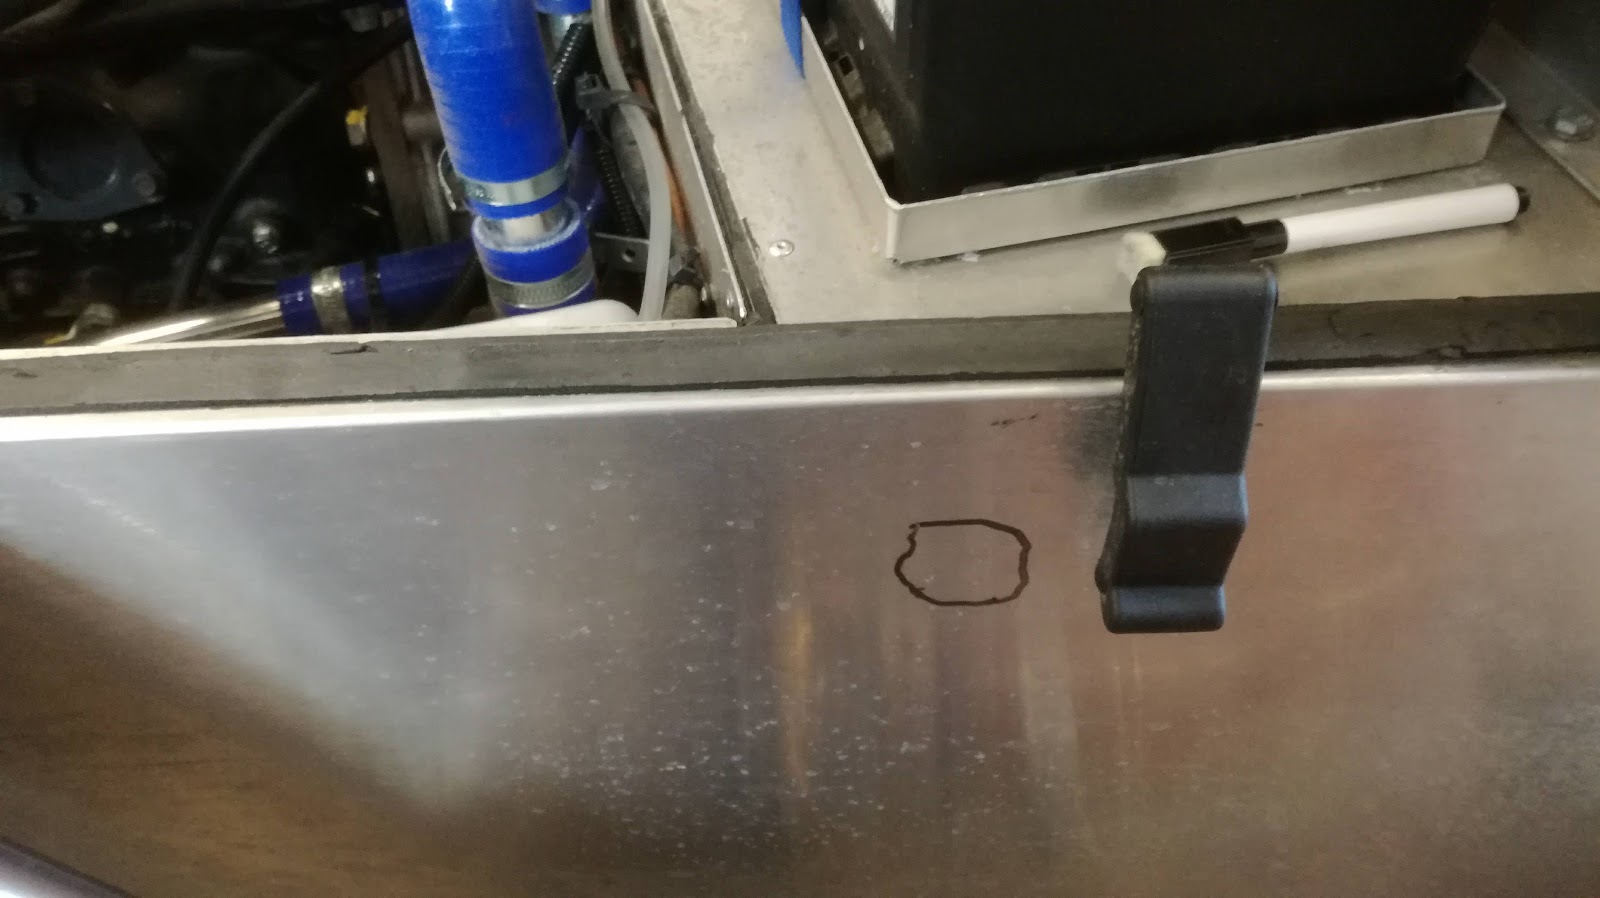
With hindsight, it was a bad bit of design; the cable looped back over a straight edge so it was rubbing on every movement of the throttle - I'm surprised it lasted 4k miles. I couldn't work out how to rig it to get home, so I called the AA. After an hour, they guy turned up and took 30 seconds to jury-rig it enough to get me home- I have much too learn!

I'm too much of a tightwad to pay GBS £30 for a new cable and it had snapped just a few inches from the end, so after a bit of research, I found a nice hunk of metal normally used for wire balconies. A bit or re-jigging of my pedal box and voila:


So, with my recent disasters fixed, I'm back to a list of other upgrades/fixes:

1. Get rid of the ugly nosecone indicators. I was thinking of replacing them with slim bike indicators but I've also got another idea - I'll keep it a surprise, in case it turns out to be rubbish.

2. There is a (hopefully) minor issue with my engine idle; from cold, it's fine but just before the lambda sensor kicks in, the engine 'hunts' - revs drop to about 750 rpm and just before it stalls, the ECU seems to realise the problem and revs up to 1200 rpm. This is only happening since I re-did the timing - does the ECU need some twiddling?
UPDATE: this seems to have cured itself - maybe a bit of dirt in an injector?

3. Windscreen washer - no power to the motor so another dodgy wiring issue.

4. Door armrests.

Sunday 14 October 2018

The pressure tells

I decided it was time to sort out my oil pressure gauge -it has never worked. I emailed Smiths and they sent me some details of how to test the gauge and sender - turns out they're both fine, so the problem was my wiring.

Rather than trying to fix my existing loom (which would have been a nightmare), i just cheated and ran a new wire from the sensor directly to the gauge, pretty much on the same route the loom took anyway. Fiddly and hard to route but i finally have a working oil pressure gauge and hopefully, i won't get worn big end bearings again.

Also spent some time tightening the fan belt (squeals a bit when cold) and raising the rear nearside suspension - it seemed to have settled a bit and I kept grounding the seat bolts on that side.

I've had a couple of occasions recently, on gloomy country roads,  where oncoming traffic has had a problem seeing me, so i think it's time for DRLs. Also, if i sit in traffic with my headlights on, i can almost see the battery voltage dropping, so LEDs are a good idea. I've ordered some all-in-one units which seem a bit cheap (£65), so i hope they're ok.

Saturday 6 October 2018

Very fast circles

So Zedster's first foray off road - a glorified car park at North Weald airfield in Essex. This was a handling day with the SKCC and it was a blast.

The day started off horribly grey and misty and 14 other members turned up:


The day was basically split in 2; the morning was spent practising a high speed turn, trying to get round as quick as possible without spinning. The afternoon was negotiating a coned-out circuit which had all types of hazards; chicane, the same high speed turn we had been on all morning, a twisty section and hairpin.

It might sound a bit basic but it was awesome fun - just being able to hammer round corners with no risk of hitting anything or anyone was very liberating. Hearing Zedster's tyres squealing and controlling oversteer was brilliant.


Here's some video of the day:


I learnt quite a few things:

1. I'm too much of a wimp with the revs - the instructor told me to rev higher but I just can't...having built Zedster, it feels like whipping my pet dog to run faster!

2. Despite always thinking Zedster is fast, one guy turned up in a 20-year old BMW 325 (admittedly highly tuned) and went faster than me round the circuit as well as round the high speed turn! Even allowing for the extra work he had done to his car, I sort of assumed a lightweight Seven would still be better round a twisty circuit, even with an only average driver like myself at the wheel.

3. My tyres are not great on the limit - the instructor said I'd have got 5mph faster round the bend if I had better tyres.

I must try a proper track day some time...

Monday 24 September 2018

A French tickler

A few months ago, someone on the SKCC forum proposed a brief , one night excursion to France. It seemed a perfect opportunity to get the wife out with me and get her more interested in Zedster. Sadly, my recent troubles meant i wasn't sure if I'd be ready in time, so I cancelled my hotel and the babysitters but the Eurotunnel tickets were non- refundable. Then, when I actually managed to get Zedster ready (6pm on the Friday night!), I decided to just go for it. Unfortunately,  this meant my wife couldn't come as we had no babysitters we could get at such late notice.

So, I left home at 5am for the 2 hour slog down the motorway to the Eurotunnel - a nerve-wracking journey trying to listen out for my sump dropping off, or some such disaster.

I arrived first because it only took 1.5 hours (thanks Google! Could have had an extra 30 minutes in bed) before the others arrived; a Caterham, couple of Tigers (or one might have been a Westfield) and a beautiful Morgan:


Sadly, this was to be almost the last dry time of the trip! Our train was delayed 2 hours and the second we drove off the train, the rain started and didn't stop until we arrived back in Folkestone!

But it was a great excuse to test Zedster in horrendous weather - and he did pretty well. One of my wiper arms stopped working an hour into the trip but this was just a loose bolt holding it on to the spindle. The other one was loose as well, so i need to get some thread lock on them for future. Once tightened, they were fine.

My roof was great except that, overnight, a puddle formed in the middle and some of this got through the material and wet my seat. Next time, i might carry some sort of pole with me to make a peak in the roof so that the water doesn't collect.

My doors were also excellent but are just lacking straps on the inside to hold them against the side of the car. Ideally, I need to bend the lower frame but I've tried and can't seem to get it to follow the side panel. Straps will also stop the sides blowing up at speed and letting spray in. The Caterham had armrests bolted into the door which doubled as the straps holding the door in as they hooked over the sill - very clever. I might try doing that...

An interesting discovery is how stable Zedster is at speed. Going past trucks at 70mph in torrential rain and strong winds and he didn't even slightly stray off line. My normal car is all over the place in that scenario - must be the low C of G.

So the trip was very wet but a nice bunch of people,  some great food, a decent hotel and lovely, empty roads.


An enjoyable trip which would have awesome if the weather had been just a bit better. But hopefully the first European trip of many... (if Zedster stays in one piece).

Friday 21 September 2018

Miracles Happen

Well, would you believe it - I've only gone and fixed it!!! I'm a sure-fire, certified, one-in-a-million ENGINEERING GENIUS!

Ok, sorry to go over the top but this was SO far outside my comfort zone as to be in the next continent. Even when I was thinking about my build, I always knew I was NOT going to go inside an engine. I obviously know the basics of how an engine works but bearings, caps, journals, galleries - these were all alien words to me and I had enough to learn.

But now I know so much more...you can tell from my earlier posts how frustrating and depressing it was BUT having done it, I'm on cloud 9 - it's so (and sorry to use a hippy, tree-hugger word here) uplifting to have successfully done something you never dreamed you'd be able to.

When I said I had screwed up the timing process last time, I don't think I had. Embarrassingly, I think I had just not put the HT lead on the plug of cylinder 4 properly, so I was running on 3 cylinders - doh! However, I still re-did it after getting the camshaft sprockets loosened and running fine.

Stretch bolts arrived, torqued up, sump on, oil in and Zedster fired up almost immediately - and the rattle was GONE! Beautiful...quick 10 mile drive to check all ok and I am a properly happy builder. Hopefully, I can spend some time driving now and less in the garage.

Anyway, enough drama - I'm off to France tomorrow at 4.30am in Zedster - talk about cutting it fine! No hotel booked (I had to cancel it because I didn't think I was going to get Zedster ready), so should be exciting (and the weather forecast is bad). Let's see if I get as far as the Eurotunnel....

Sunday 16 September 2018

Bearing up

Gawd, i wish I'd taken the early advice of a forum member who said on day 1 that my problem was big end bearings. At the time, that was the worst possible news for me and I was desperately hoping for a simpler solution. As it is, changing the bearings is far simpler than I'd expected....

I've sort of done all 4 now - this is what they looked like (cylinder 1 on the left, no. 4 on the right):


Weird how cylinder 1 is so bad and the others just have a slight mark down the centre (not sure if that is normal or the start of a problem?).

Anyway, taking them out and replacing took no more than 30 minutes going slowly. The only problem is one that has plagued me since day 1 of my build - bolts! Those cap bolts are stretch bolts which are one use only, so I've had to order new ones from Ford (the only place to get them) - going to take a few days to arrive so I can't rebuild the bottom end until then.

Once they arrive, i can re-do the timing. I'm going to take the cams out, take them to a garage and ask them to use their air wrench to loosen the sprockets. I should be able to do the timing properly then.

Annoyingly, I've had to cancel a weekend trip to France on the 22nd because i can't be sure I'll be done by then. I've got a handling day on Oct 5th which I'm desperate to get to...better be or I'm going to have to do a John Cleese on Zedster!

Tuesday 11 September 2018

It all becomes clear

So, valve clearances....this is the process:

1. Engine at TDC, remove rocker cover.
2. Remove fan belt.
3. Remove crankshaft pulley.
4. Remove 3 timing belt covers.
5. Loosen tensioner and remove timing  belt.
6. Loosen camshaft sprockets.
7. Remove camshaft caps and camshafts.
8. Replace required shims.
9. Rebuild in reverse, using special timing tool to get camshafts in right place.

This is a summary of what the Haynes manual says. What the effing manual DOESN'T say is that for items 3 and 6 you really need an air compressor and gun because the bolts are done up flipping tight. What it also neglects to mention is that Ford only do shims in set thicknesses and did they have the one I needed? Go on, guess the answer....

The problem is made worse by the fact that you don't know what shim size you need until you have taken everything off to get to the existing shims!

So i decided to cheat (you can see where this is going) and I didn't take the crankshaft pulley off, or the camshaft sprockets, relying on the timing tool to work. Needless to say, it didn't and now my timing  is slightly out and Zedster doesn't idle or run smoothly. While the camshafts were out, i didn't see any obvious cause of my rattle.


Bugger.

I decided to leave the timing to another day and concentrated on the bottom end. Amazingly, it took just 2 hours to get the sump off and the first big end bearing removed.

And EUREKA!


That's one of my bearings on the right, the one on the left is a new one and what it should look like. That is one knackered big end bearing. Worse, it has scratched the crankshaft:


Next step is to see whether that is something i can just clean up myself or if it needs removing and taking  to an expert. I know what my money is on...

With hindsight,  i wish i had taken the big end caps off when i first took the sump off but i was just too scared. ..the joys of experience.

Thursday 30 August 2018

Annoyed!

This is getting annoying now...

After a stupidly expensive 2 week holiday which has not relaxed me and ended badly (long story), I'm still not much closer to resolving my problem.

What is so frustrating is how no-one can pin the problem down - I've spoken to several mechanics, posted videos and pictures to various forums and I've got suggestions that point to every part of the engine! Every time I think I have found something, someone else comes up with another theory.

So, current situation; Simon (ex-GBS) and 1 or 2 others think it's top-end, not bottom end. As it's easier to take the top off, I've done that and checked the valve clearances. All are fine EXCEPT one intake valve on cylinder 3 which is on the limit (0.11mm gap). This is unlikely to be the cause of my rattle as tight valves don't make a noise but I need to fix it anyway, which involves taking the camshafts out to replace a shim. While they are out, I should be able to check the valve springs aren't loose (?), which might cause the rattle and maybe some other stuff (hopefully, Simon can make some suggestions about what to check).

Once done, and assuming I don't find a problem, looks like I will need to go into the bottom end and do/check the big-end bearings. If they aren't the problem, then it's a problem that will need the engine out and engine stripping, not something I have the time, space or tools to do.

This is a real low point in the life of my kit car journey - I've honestly contemplated just sticking the whole thing up for sale and cutting my losses. If I can't fix this, that may be my only option...

One plus is that the DVLA have agreed to give me a new registration, after I sent them a letter explaining how i incorrectly filled in one of the forms and that, actually, all my parts were new (except the gearbox). So i now have a 17 reg plate and i can maybe buy a private plate in future (if i ever get back on the road).

Wednesday 1 August 2018

(Not) Under Pressure

Well, there may be light at the end of the tunnel...although, it's a dreary, grey light...

I popped into my local Ford dealer, he had a listen and said it wasn't the starter motor, as I was hoping. He said it was almost certainly internal - bugger!

After more quality time on YouTube, I found a good series of videos by a US mechanic who had some great suggestions. Basically, for future reference, this is a good diagnostic process to follow to identify an engine noise:

1. Oil pressure test - I should be seeing 3 to 5 bar at idle. If it's low, you might get top-end rattle and, long-term, wear at various points.

2. Compression test - if one or more cylinders have low compression, that indicates a valve (top-end) problem.

3. Spark plug test - remove the HT leads from one cylinder at a time while the engine is running. If the suspect noise disappears, the problem is bottom-end on that cylinder.

So, test 1 (I bought an oil pressure tester) and I am now getting 5 bar at idle BUT I have no idea what I was getting before, as my dash gauge has never worked properly.

Missed out test 2 (I've ordered a compression tester but not arrived yet).

Test 3 - and VOILA!! With the HT lead off cylinder 1, no rattle, no matter how hard I rev. Repeated for the other cylinders and the rattle was still there.

So, I think I've had low oil pressure from day 1 because of that rubbish oil pickup being too close to the bottom of the sump and not allowing the pump to get enough oil round the engine. Over the 3.5k miles I've done in the last year, this lack of oil has caused premature wear in the big-end bearings, to the extent that it is now noticeable on cylinder 1 (and maybe the others to follow soon).

As I've cried wolf a few times recently, I'll hang fire on saying this is definitely the problem until some more people agree with me but it seems plausible.

Now, I just need to work out how to fix it...

Friday 27 July 2018

Un-eureka

Argh!! After all that work, i put it all back together and...still rattling! In fact, it's  worse!

BUT I think i know what it is now - step forward Mr Starter Motor.

To get the sump off,  I had to take the starter motor off (in fact, I just unbolted it and moved it aside). When I came to put it back on, I noticed that the main body was a little loose. It has a base that bolts on to the bellhousing but the main body, I believe has a couple of long , internal bolts that hold it on. I don't know how and why but something has come loose internally and I'm almost certain (again) that is my rattle. Definitely. Maybe.

So, do I blow another £100 or so for a new one? I drove to work today and the rattle is unbearable so it looks like I'm going to have to, and pray that is the problem.

On the plus side, after 2 months of baking heat and clear skies, today was the first bit of rain BUT I have doors and a roof - and they work! The doors are awesome; really solid, no flapping about and the windows work really well. They're just clear plastic with velcro on 3 sides, so you just pull it down and, voila! In fact, the doors are so good, they kept all the engine heat in as well. Horrendous today when it was still around 30 degC but will be great when normal British weather returns.

So, more expense...great, kitcars, aren't they?

Thursday 19 July 2018

Eureka?

I wasn't getting anywhere trying to find the rattle UNTIL I cleaned up the sump in preparation to taking it to a local welder to fill in the hole. With it cleaned, a magic symbol appeared:


See that ring? That is where the oil pickup sits and no way should it be making that mark. That means that it is touching or maybe occasionally touching and making my rattle?

The pickup felt very solid when i took the sump off so I'm not sure if it is the rattle but it certainly should be at least a few mm off the bottom of the sump. I thought about trying to bend it but it's steel and thick - not easily bent. Then i looked a bit more closely:


Can you see how the end has been welded on the tube? It's offset by a few mm...so I'm going to take it to the same bloke who welded up my sump and see if he can re-weld the end on but better that it was done originally. If that works, it should give me the few mm clearance i need. Basically, i seem to have got a 'friday afternoon' sump kit from Tiger!

I mentioned the sump - the guy has done a good job:


Sunday 8 July 2018

The Long Haul

Well, it's been a frustrating month since my last post...

Despite my PMA (positive mental attitude), my engine rattle didn't disappear. Admittedly, I only used half a tank of fuel with the cleaning additive but still rattling. I met up with Matt from the SKCC forum who's a great bloke - a mechanic who has been racing and building cars since he was 12. He's the guy who helped me setup my front suspension shortly after IVA.

Despite all this experience, neither he nor his brother (who worked for Ford as a mechanic for years) could explain what my rattle was. Using the long-pole-and-an-ear technique, he believed the noise was coming from the front of the engine and suggested the only way forward was to take the sump off and see if anything showed up.

With the design of the GBS (and most kits), taking the sump off is much simpler than a normal car as it can easily drop out underneath with only the starter motor that needs to come off. So, off came the starter motor and the sump bolts came out with no difficulty at all. Then, it all went to Hell...

The sump just wouldn't drop. I had used sealant round the edge but I cleared most of that out so that shouldn't be the problem. I spent over a week of evenings trying numerous different techniques to lever the damn thing off. Even Matt couldn't work out why it would not come off. Then, a post on the Tiger Owners forum suggested that the problem might be the windage tray. I used the tray that came with the ERA sump from Tiger but it seems it is a VERY snug fit in the sump, not something I noticed when I fitted it. Now, when trying to pull the sump down, the curved edges of the tray were digging into the side of the sump - the harder I hit it, the more it dug in!!

A cheap endoscope verified this was the problem as I could clearly see the edge of the tray dug into the sump wall. After a few more days of trying to get round this, I admitted defeat and took the last resort - I drilled a hole in the bottom of the sump and used a screwdriver to lever the tray away from the sump wall. The sump dropped off almost immediately. Jesus, what a ball-ache...!!


In the pic above, you can see the hole I had to drill and the groove above it, cut into the wall of the sump by the tray.

Now the sump is off (and I need to find someone to fill that hole now), I can't see any obvious problem; the oil pipe and windage tray are solid, there is slight play in the bottom ends but I'm guessing that is normal as all 4 cylinders are the same. I'll have to get Matt over to have a look...I don't really know what I'm looking at.

Some better news, my doors are done and they look awesome:


I just need to bend the frames a little in places to follow the curve of the body but otherwise they look great.

Hopefully back on the road soon - I've got a long holiday for most of August and then a very busy September planned for Zedster; an epic long journey, a trip to Brands Hatch, our first foreign trip and a handling day in early October.

Wednesday 13 June 2018

Back from the Abyss

What a difference a day makes, as they say...

I took the aux panel off and, after a bit of head-scratching, I realised the incredibly stupid wiring mistake I had made. Seriously, I have an electronics degree - how the heck did I pass that?

With that fixed, my LED strip works fine and, most importantly, the lambda sensor is working properly. It really seems to be a good piece of kit - using the Emerald software, I can see it making continual adjustments and the strong petrol smell is mostly gone. It still needs some tweaking because the engine bogs down a bit when pulling away in first gear - I'm guessing the sensor can't keep up with rapid change in AFR (air/fuel ratio) but I'm sure there will be a setting somewhere to help with this. Bit of research needed...

I'm more and more convinced that my rattle is engine knock and not something mechanical. The rattle is just so random - there is no pattern to it at all. Sometimes it rattles at idle, other times not, sometimes while accelerating but not always etc, etc. If it was mechanical, surely there would be a clearer pattern? Anyway, that's my opinion and I'm sticking to it.

I reckon the 8 months or so of running rich has coked up the cylinders (and the spark plugs were pretty black when I checked them) and that is a known cause of engine knock. I'm going to buy some engine/injector cleaner and hope that helps clean the cylinders out; otherwise, I'm hoping they will eventually clear out now that I'm running with the correct mixture.

HINDSIGHT: get a wideband lambda sensor or a rolling road session asap after IVA.

Richy (the guy doing my doors) sent me a few pics of progress and they're looking awesome - can't wait to get them. Hopefully, end of this month (he is also busy building his own caravan from scratch!).

So, all in all, much happier today...let's pray my head-in-the-sand attitude bears fruit, hey?

Monday 11 June 2018

The lows and the lows

Not having a good time...

Alternative theories for the rattle were propounded and then i noticed that it also sometimes happened when i pressed the clutch, even gently, which suggested a possible problem with the thrust bearing or even the clutch itself.

Another suggestion was the water pump bearing and that seemed to be a possibility; when i took off the fan belt and ran the engine briefly, no rattle. So, for £25, i bought a new one:


Sadly, that didn't help - argh!

Then, after some time on YouTube, i heard a typical engine knock and it sounded exactly like my rattle. Its also a bit more random which fitted better with my symptoms.

Engine knock is basically a result of bad engine tuning. A clutch problem needs the engine taking out, something I'm desperate to avoid doing - just the thought of trying to do that in my single garage; draining water, oil, unbolting exhaust, engine mounts, wiring - arrgghhhhh!!!

So, I'm praying that the wideband lambda sensor will fix everything - but its not looking good.

I've changed the coolant and oil. There were a few tiny metal particles in the old oil but it doesnt seem to be enough to suggest engine wear, more like normal wear from a relatively new engine.

The sensor took 2 weeks to arrive  (i had to order it from Holland) and i finally fitted it a few days ago. I decided it would be easier to go through the passenger footwell, so drilled a hole through the side:


Wired up and, initially, everything seemed ok - followed the calibration process after some discussions with Richard and i could see the sensor doing its thing; after reaching 60 degC, system went closed loop and i could see the AFR figures hovering round the 14.5 mark, as it should. Best of all, i could tell that there was no strong petrol smell from the exhaust.

Now, unfortunately,  at this point, i decided to wire in an LED strip under the dash to give me some light at night on the aux panel and my clock. What i didn't realise was that my superb wiring abilities (not) meant the labda sensor and LED strip are on the same circuit and as soon as i connected up the LED, it blew the fuse. So off i went on a test drive with a non-functioning sensor! Not surprisingly, i had running problems; stalling at low speeds and RPM.

So, i need to revisit the wiring...but I'm still worried that the rattle might be mechanical.

Couple of extra pics - first, a pretty clam shell to hide the hole:


This is the lambda controller under the scuttle:


...and this is the new switch for the LED strip: